
こんにちは!
今回はカスタムビューを作成したいと思います。
カスタムビューとは?
カスタムビューとはTextViewやButtonのような既にAndroidが用意されているVIewと異なり、自身で作成したViewの事をカスタムビューといいます。
カスタムビューを作成するメリット
作成したViewを使いまわせる
レイアウトXMLに直接Viewを組み合わせて作ったViewをクラス化することにより使いまわせる事が可能です。他の画面で同様のViewを使いたい場合によく使います。
ActivityやFragmentがスッキリする
カスタムビュークラスにメソッドを保持させ、処理を委譲することによりActivityやFragmentに処理を記載しなくて済むのでActivityやFragmentがスッキリします!
前提準備
まずはカスタムビュー用のレイアウトXMLを作成します。
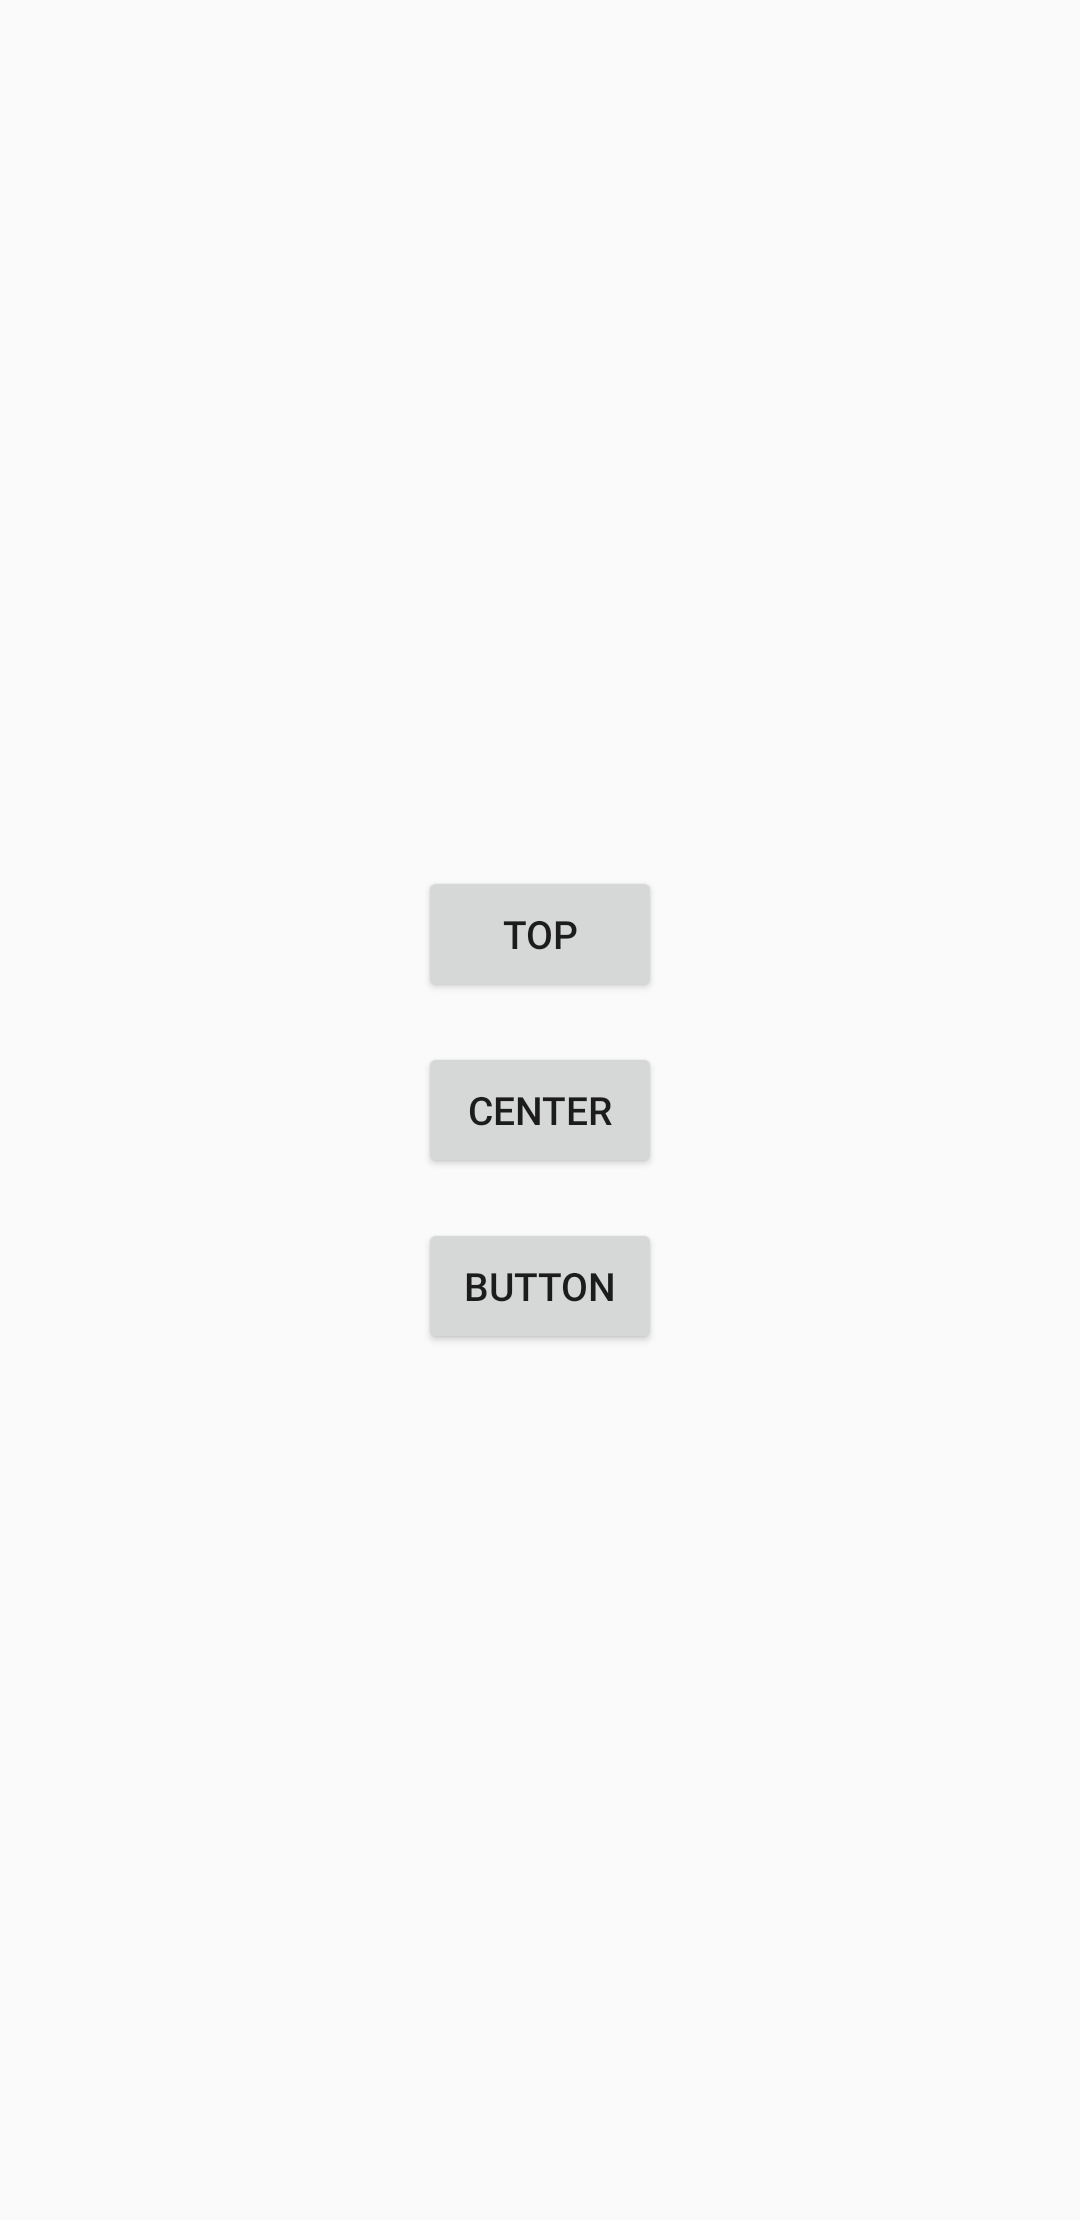
今回はボタンが3つ置いてあるカスタムビューを実装します。
<?xml version="1.0" encoding="utf-8"?>
<androidx.constraintlayout.widget.ConstraintLayout
    xmlns:android="http://schemas.android.com/apk/res/android"
    xmlns:app="http://schemas.android.com/apk/res-auto"
    android:layout_width="wrap_content"
    android:layout_height="wrap_content">

    <Button
        android:id="@+id/topButton"
        android:layout_width="wrap_content"
        android:layout_height="wrap_content"
        android:text="top"
        app:layout_constraintTop_toTopOf="parent"
        app:layout_constraintStart_toStartOf="parent"
        app:layout_constraintEnd_toEndOf="parent" />

    <Button
        android:id="@+id/centerButton"
        android:layout_width="wrap_content"
        android:layout_height="wrap_content"
        android:layout_marginTop="16dp"
        android:text="center"
        app:layout_constraintTop_toBottomOf="@id/topButton"
        app:layout_constraintStart_toStartOf="parent"
        app:layout_constraintEnd_toEndOf="parent" />

    <Button
        android:id="@+id/bottomButton"
        android:layout_width="wrap_content"
        android:layout_height="wrap_content"
        android:layout_marginTop="16dp"
        android:text="button"
        app:layout_constraintTop_toBottomOf="@id/centerButton"
        app:layout_constraintStart_toStartOf="parent"
        app:layout_constraintEnd_toEndOf="parent" />

</androidx.constraintlayout.widget.ConstraintLayout>
カスタムビューのレイアウトXMLが作成できたら続いてはカスタムビューのクラスを作成します。
public class CustomView extends ConstraintLayout {
    private Button mTopButton;
    private Button mCenterButton;
    private Button mBottomButton;

    public CustomView(@NonNull Context context) {
        this(context, null);
    }

    public CustomView(@NonNull Context context, @Nullable AttributeSet attrs) {
        this(context, attrs, 0);
    }

    public CustomView(@NonNull Context context, @Nullable AttributeSet attrs, int defStyleAttr) {
        super(context, attrs, defStyleAttr);
        // XMLとクラスを紐づける
        View.inflate(getContext(), R.layout.view_custom, this);
        // 各ボタンのインスタンスを取得
        mTopButton = findViewById(R.id.topButton);
        mCenterButton = findViewById(R.id.centerButton);
        mBottomButton = findViewById(R.id.bottomButton);
    }

    // topボタンにクリックイベントを設定する
    public void setTopClickListener(OnClickListener listener) {
        mTopButton.setOnClickListener(listener);
    }

    // centerボタンにクリックイベントを設定する
    public void setCenterClickListener(OnClickListener listener) {
        mCenterButton.setOnClickListener(listener);
    }

    // bottomボタンにクリックイベントを設定する
    public void setBottomClickListener(OnClickListener listener) {
        mBottomButton.setOnClickListener(listener);
    }
}
class CustomView constructor(context: Context, attrs: AttributeSet? = null, defStyleAttr: Int = 0)
    : ConstraintLayout(context, attrs, defStyleAttr) {
    private val topButton: Button
    private val centerButton: Button
    private val bottomButton: Button

    init {
        // XMLとクラスを紐づける
        View.inflate(getContext(), R.layout.view_custom, this)
        // 各ボタンのインスタンスを取得
        topButton = findViewById(R.id.topButton)
        centerButton = findViewById(R.id.centerButton)
        bottomButton = findViewById(R.id.bottomButton)
    }

    // topボタンにクリックイベントを設定する
    fun setTopClickListener(listener: OnClickListener?) {
        topButton.setOnClickListener(listener)
    }

    // centerボタンにクリックイベントを設定する
    fun setCenterClickListener(listener: OnClickListener?) {
        centerButton.setOnClickListener(listener)
    }

    // bottomボタンにクリックイベントを設定する
    fun setBottomClickListener(listener: OnClickListener?) {
        bottomButton.setOnClickListener(listener)
    }
}
カスタムビュークラス作成について意識したいポイント
1. レイアウトXMLとクラスを紐づける
// XMLとクラスを紐づける
View.inflate(getContext(), R.layout.view_custom, this);
上記記述でレイアウトXMLとクラスを紐づけます。こちらの記述を忘れるとレイアウトXMLとクラスが紐づかないので要注意です!
2. 必要に応じてメソッドを作成する
今回はボタンを3つ配置しているので各ボタンに対してクリックイベントを設定するメソッドを作成しています。他にも行いたい処理があればメソッドを追加してみてください。
カスタムビューを表示する
準備ができればカスタムビューを表示してみましょう!
筆者はMainActivityに表示しようと思います。
まずは表示したい画面に紐づいているレイアウトXMLにカスタムビューを配置します。
<?xml version="1.0" encoding="utf-8"?>
<androidx.constraintlayout.widget.ConstraintLayout
    xmlns:android="http://schemas.android.com/apk/res/android"
    xmlns:app="http://schemas.android.com/apk/res-auto"
    android:layout_width="match_parent"
    android:layout_height="match_parent">

<com.example.androidstudyjava.CustomView
    android:id="@+id/customView"
    android:layout_width="wrap_content"
    android:layout_height="wrap_content"
    app:layout_constraintTop_toTopOf="parent"
    app:layout_constraintBottom_toBottomOf="parent"
    app:layout_constraintStart_toStartOf="parent"
    app:layout_constraintEnd_toEndOf="parent" />

</androidx.constraintlayout.widget.ConstraintLayout>
配置ができたら次は表示画面のクラスでカスタムビューに対して処理を行えば実装終了となります。
    // CustomViewのインスタンスを取得
    CustomView cv = findViewById(R.id.customView);
    // 各ボタンにクリックイベントを設定する
    cv.setTopClickListener(v -> {
        // Topボタンクリック時に実行したい処理を記述
    });
    cv.setCenterClickListener(v -> {
        // Centerボタンクリック時に実行したい処理を記述
    });
    cv.setBottomClickListener(v -> {
        // Bottomボタンクリック時に実行したい処理を記述
    });
// CustomViewのインスタンスを取得
val cv: CustomView = findViewById(R.id.customView)
// 各ボタンにクリックイベントを設定する
cv.setTopClickListener(View.OnClickListener{ v ->
// Topボタンクリック時に実行したい処理を記述
})
cv.setCenterClickListener(View.OnClickListener{ v ->
// Centerボタンクリック時に実行したい処理を記述
})
cv.setBottomClickListener(View.OnClickListener{ v ->
// Bottomボタンクリック時に実行したい処理を記述
})下記が実装後画面スクショとなります。
最後に
いかがでしたでしょうか
カスタムビューの作成には他にもViewを継承して一からViewを作成する方法等あるので
気にある方はそちらも実装見てください。
それでは!
コメント
[…] 前回はカスタムビューを作成しました。 […]